
Products and stock
Save what you sell once, then pick it on every invoice. Stock goes down as you sell and up as you buy.
#The product list
Products in the sidebar opens your catalogue: the goods and services you sell or buy, with their prices, GST rate and stock. Save an item here once, and on every invoice you just type a few letters of its name to fill in the HSN, rate, unit and GST.
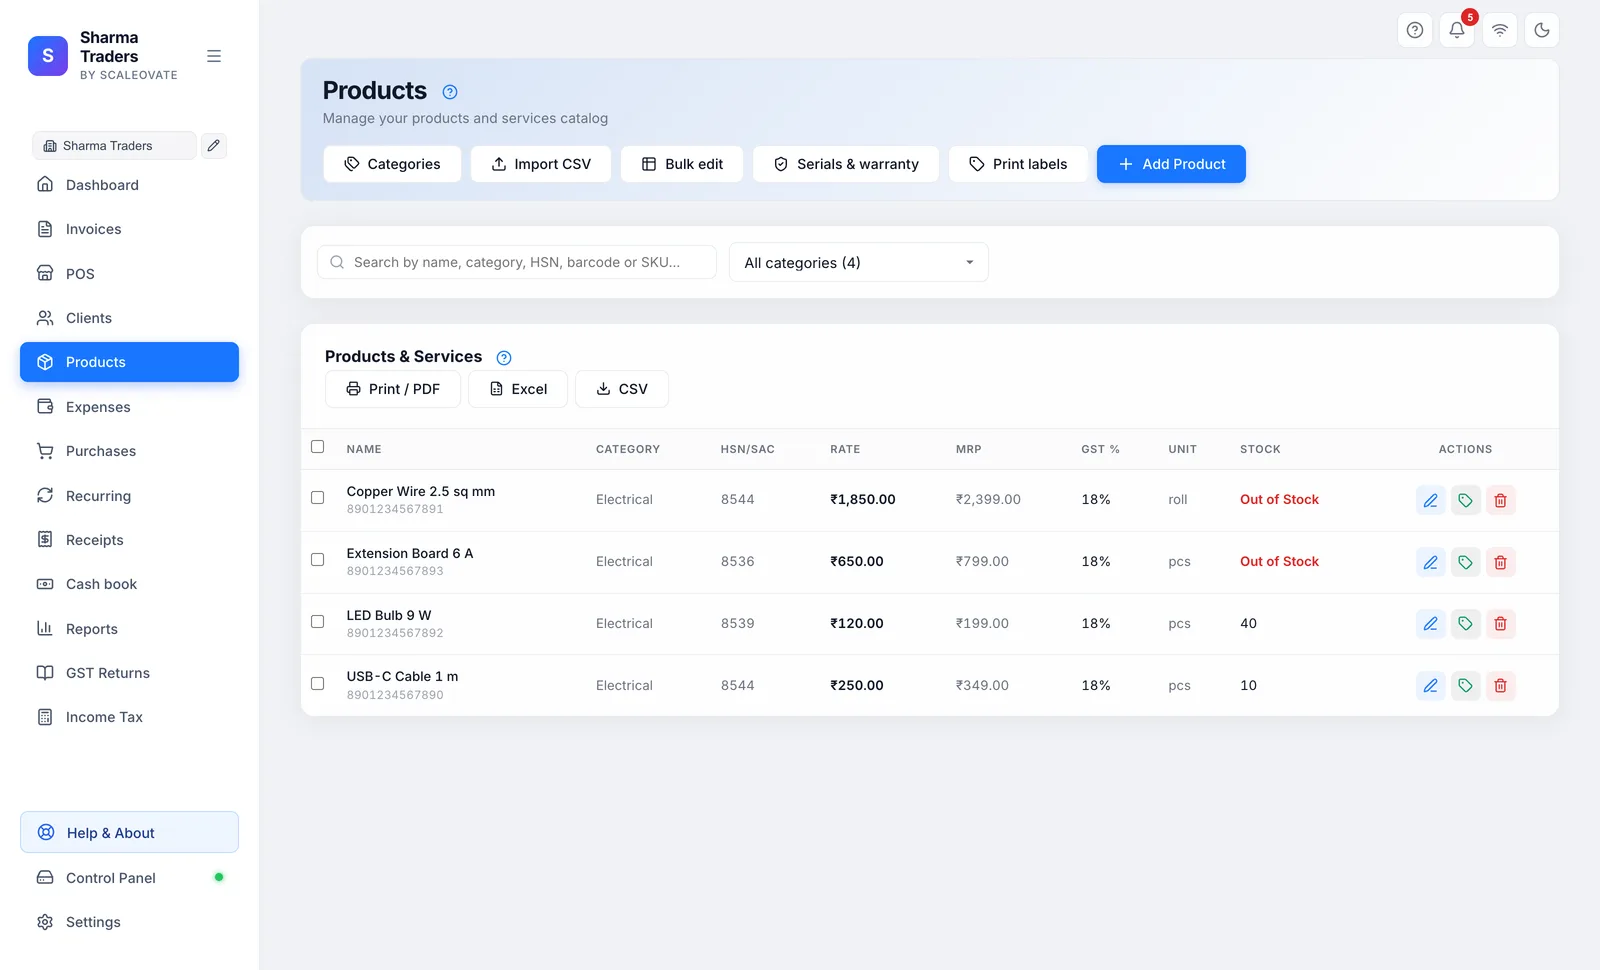
The buttons at the top of the screen:
| Button | What it does |
|---|---|
| Import CSV | Adds many products at once from a spreadsheet. See Importing products. |
| Bulk edit | Turns the list into a grid you can type in, to change many products at once. See Bulk edit. Greyed out until you have a product. |
| Categories | Creates, renames or removes product categories. The product form picks from this list. See Categories. |
| Print labels | Prints barcode labels with the MRP and sale price, on a roll or an A4 label sheet. Tick products first to start with those, or scan them in the label window. See Printing labels. |
| Make | Only when manufacturing is turned on: records goods you made from raw materials. See Manufacturing. |
| Godowns | Only when godowns are turned on: where stock sits, and transfers between shops and warehouses. See Godowns. |
| Serials & warranty | Every serial number sold and its warranty, read from your invoices. See Serial numbers and warranty. |
| Add Product | Opens the product form. See Adding a product or service. |
Search by name, category, HSN, barcode or SKU... narrows the list as you type, and finds a product by its search words too. The cross clears it. Beside the search box, the category list shows only one category, or only the products with no category; each choice shows how many products it holds. See Categories.
Deleting many products at once: tick the box at the start of each row (the box in the header ticks every product the list shows), then click Delete selected and confirm. Only ticked products the list shows are deleted; invoices that used them keep their lines. Clear unticks them all.
The Products & Services table:
| Column | Shows |
|---|---|
| Name | The product name. Point at it to see its description. A product made from raw materials also shows Made here · cost ₹… per unit under its name. A tracked product adds a line such as Batches: 40 in 2 or Serials · 12 month warranty. See Batches and expiry. |
| Category | The group the product belongs to, such as Stationery or Services, or a dash. See Categories. |
| HSN/SAC | Its HSN or SAC code, or a dash. |
| Rate | The selling price. |
| MRP | The printed maximum retail price, or a dash when none was saved. Labels can show it struck through beside your selling price. See Barcodes, MRP and labels. |
| GST % | The GST rate. |
| Unit | Pcs, Kg, Hrs and so on. |
| Stock | How many you have. Out of Stock in red at zero or below; the number in amber when it is at or below your low-stock threshold. Service for a service, which has no stock, and a dash (-) for goods whose stock was never entered: neither is ever out of stock. |
| Actions | The pencil (Edit) opens the product form; the bin (Delete) deletes it after asking. |
Products are shared by all your businesses, so each business sees the same list and the same stock.
#Categories
A category is a word that groups products, such as Stationery, Electricals, Services or Packing. Categories help you find a product and limit the list to one group, for example when pricing a wholesale order or printing labels for one shelf.
- Create the categoriesClick Categories at the top of the Products screen, type a name such as Stationery and click Add. It is on the product form's dropdown straight away, before any product uses it.
- Give a product its categoryOn the product form, pick one from the Category dropdown, or choose + New category… and type a name to add it on the spot. Add Product has the same box. A product can have one category, or none.
- Filter the listThe list beside the search box starts on All categories and shows each category with how many products it holds. Choose one to see just those; products with no category are under Uncategorised. Search and the category filter work together.
- Rename or remove oneIn the Categories window, each category shows how many products use it. Change a name and click Save on that row: every product in the category is updated at once.
Renaming onto a name that already exists merges the two: the products of both categories end up in one, and nothing is deleted. The bin beside a category clears it from its products, after asking; the products, their prices and their stock stay exactly as they were. A category you created stays in the list with 0 products until you remove it, so you can keep it ready for next season.
The product stores its category; the Categories window is the menu the form picks from. To move one product to another category, change it in the product form; to move a whole category, rename it here. A category typed into a spreadsheet import joins the list too.
Spelling: "Stationary" and "Stationery" are two different categories until you rename one onto the other, which merges them. When importing, a Category, Group or Item Group column fills the category, and Tally's stock group arrives as one. See Importing products.
Categories only sort the catalogue. They do not change prices, GST, stock or what a document prints, and an invoice line does not show a category.
#Printing or exporting the list
Print / PDF, Excel and CSV beside the table title save the products shown, with name, category, type (Goods or Service), HSN/SAC, purchase price, selling price, MRP, GST %, unit and stock. Search first to save only some. Print / PDF opens the print window, where you can choose a printer or Save as PDF. The buttons are hidden during a bulk edit.
A CSV saved here can be opened in Excel, and is a handy way to send your price list to an accountant. It can also be brought back in with Import CSV, or into another copy of the app.
#Deleting a product
The bin asks Delete this product? first. Deleting removes it from your catalogue only: invoices and purchase bills that used it keep their lines unchanged. If it is a raw material of a product made here, the message names those products: remove it from their raw materials list too.
A product deleted here is not in the Trash; to get it back, add it again.
#Adding a product or service
- Open the formClick Add Product. To change a product, click its pencil instead; the form opens as Edit Product.
- Name itType the name as you want it printed on the invoice, such as "A4 Paper Ream 75 GSM" or "Website Maintenance".
- Goods or serviceUnder This is a, leave Goods (stock counted) for things you keep on a shelf, or click Service (no stock) for work you do, such as printing, repairs or consulting. See Goods or service.
- Group itOptionally pick a Category from the dropdown, such as Stationery, or choose + New category… to add one. It groups the product in the list; a product can go without one. See Categories.
- Codes and pricesFill in the HSN or SAC code, the purchase price, the selling price, the printed MRP and the GST %.
- Unit and stockChoose the unit and, for goods, type how many you have today. A service has no stock box.
- Batches, serials and warrantyOnly if you need them: tick Track batches and expiry for medicines or food, or Track serial numbers for electronics, and give a warranty in months. See Batches and expiry and Serial numbers and warranty. Leave both unticked for ordinary goods.
- SaveClick Save (or Update when editing). You see "Product added" or "Product updated", and it appears in the list.
Cancel closes the form without saving. So does clicking outside it, so finish and save before you click elsewhere.
| Field | What to know |
|---|---|
| Product / Service Name * | Required. Two products should not share a name: invoices, purchase bills and imports find products by name. |
| This is a | Goods (stock counted) (to start) or Service (no stock). See Goods or service. |
| Category (optional) | A word that groups the product, such as Stationery or Services. Pick one from the list, or choose + New category… to add it; it is saved on the product. See Categories. |
| HSN / SAC Code | HSN for goods, SAC for services. For a service the box is labelled SAC Code. See HSN and SAC codes. |
| Purchase Price | What you pay the supplier for one unit. Filled in on new purchase bills, used to value your stock and to cost things you make. |
| Selling Price | What you charge for one unit. Filled in on new invoices, and shown as the Rate in the list. Type it the same way your invoices work: before GST, unless you make tax-inclusive invoices. |
| MRP (printed on the pack) | Optional. The maximum retail price printed on the packet. It shows in the list and on labels, which can strike it through beside your selling price; it is never used to bill. See Barcodes, MRP and labels. |
| GST % | The GST rate, such as 5 or 18. 0 to 100; blank counts as 0. Since 22 September 2025 most goods are at 5%, 18% or 40%. |
| Unit | Pcs to start. Pcs, Nos, Kg, g, Tonne, Ltr, ml, Mtr, cm, Ft, In, Sq.ft, Sq.m, Hrs, Day, Week, Month, Year, Visit, Session, Project, Word, Page, Box, Dozen, Pair, Set, Bag, Roll, Bottle, and your own custom units, marked ★. |
| Stock Quantity | Goods only. How many you have now. After this, sales and purchases change it for you; see How stock is counted. Left blank, the stock is not counted: the list shows a dash, never Out of Stock, until you type a number, buy it on a purchase bill or sell it. |
| Track batches and expiry | Goods only, and off to start. Turn it on and list the batches you hold in Batches (batch number, expiry, quantity, cost). Purchase bills and goods receipts then ask for a batch on each line, and sales come out of the earliest-expiring batch first. See Batches and expiry. |
| Track serial numbers | Goods only, and off to start. An invoice or POS line then asks for the serial numbers sold, and each one joins the warranty register. |
| Warranty (months) | Shown when Track serial numbers is on. How long the warranty runs from the sale: 0 to 120 months, 12 for one year. A new invoice line copies it; the copy on the line is what the warranty register uses, so changing it later does not rewrite past sales. |
| Description (optional) | For your own reference. It shows when you point at the name in the list. |
| Made here (from raw materials) | Only when manufacturing is turned on. See Bill of materials. |
Changing a product's price or GST % does not change invoices already made. New invoices use the new figures.
"Product name is required": fill in the name. "GST % must be between 0 and 100": type just the number, such as 18, not 18% or 0.18.
A service shows Out of Stock in red: it was saved as Goods (all products made before version 1.10.83 are). Click its pencil, choose Service (no stock) and click Update.
#Barcodes, MRP and labels
A USB or Bluetooth barcode scanner works like a keyboard: it types the code and presses Enter. Nothing needs pairing or setting up in the app. Scan into the search box on Products, POS or a Purchase Bill and the right product is found.
The Barcode, MRP and label part of the product form holds:
| Field | What it is for |
|---|---|
| Barcode | The code on the packet. Scan it here to save the packing code, type it, or click Generate for a valid in-store EAN-13. In-store codes start with 2, so they never clash with a manufacturer's code. A 12-digit EAN gets its check digit added when you save. |
| Item code / SKU | Your own code, such as PG-100G. It can be scanned or searched too. |
| MRP | The printed maximum retail price. Labels can show it struck through beside your selling price, with the saving. |
| Other names / search words | Comma-separated words that should find the product, such as biscuit, glucose. Useful for the shop spelling and the customer's word for the same thing. |
| Batch no. and Expiry | Optional. Printed on a label when ticked, useful for medicines, food and cosmetics. |
The barcode, SKU and search words all work in the Products search and at the POS counter.
#Scanning at the counter
On POS, scan a product: it goes straight into the cart, and scanning the same item again adds one more. If the code is not in your catalogue yet, a small form opens with the code already filled in; give it a name and price, save, and the item is in the cart.
#Scanning goods in
On Add Purchase Bill, the scan box above the items adds a line at the supplier's price. Scanning the same product again raises that line's quantity. Saving the bill raises the stock, so scanning as you unpack a delivery keeps Products and stock in step. An unknown code opens the new-product form first.
#Printing labels
Print labels at the top of Products, or the tag button on a row, opens the label printer. Scan or search products, set how many copies of each, and choose a size:
| Size | Best for |
|---|---|
| 25 × 12 mm roll | Small packets and jewellery tags |
| 38 × 25 mm roll | The common shop label |
| 50 × 30 mm roll | Bigger packets, with the business name |
| 100 × 50 mm roll | Shelf and carton labels |
| A4 sheet, 65 labels (38.1 × 21.2 mm, 5 × 13) | Avery-type sheets, printed on an ordinary printer |
| A4 sheet, 24 labels (63.5 × 33.9 mm, 3 × 8) | The common A4 label sheet |
| A4 sheet, 16 labels (99.1 × 34 mm, 2 × 8) | Address-sized labels |
| A4 sheet, 12 labels (99.1 × 48 mm, 2 × 6) | Large shelf labels |
On a sheet, each label sits in its own cell and the sheet is always filled completely: whatever you queued repeats from the start to pad the last grid, so one product at one copy on a 16-label sheet prints 16 copies across the page, and a bigger queue wraps onto fresh sheets. The first cell starts a little way in from the top and left of the page rather than at the paper edge, so a printer that cannot print right up to the edge still prints it whole. The top gap is about 13 mm on the 24- and 16-label sheets, 11 mm on the 65-label sheet and 4.5 mm on the 12-label sheet; the columns are centred across the page. Print one sheet first and hold it against the label sheet to check the fit before printing a whole batch.
The app asks the printer for the label's own paper size — A4 for a sheet, or the roll's 38 × 25 mm and so on — with no margins, so the print window opens with that size already chosen. Leave it there: if the window remembers a different size from an earlier job, the labels will be laid out for a page they are not printed on and only part of the sheet comes out.
Choose what the label shows: MRP and sale price, sale price only, or MRP only; the business name, the digits under the barcode, a "Save ₹…" line, and the batch and expiry. The preview shows the first labels exactly as they will print. In the print window pick Actual size (100%), not "Fit to page", and turn off headers and footers, or the labels will not line up on a sheet.
No printer? The label window also has a Save as PDF button. It saves the exact same layout — A4 for a sheet, or one roll label per page — as a PDF you can email to a print shop or print later. If you press Print on a computer with no printer set up, the app says so and points you to this button instead of a confusing system error.
A roll label printer usually appears as a normal printer. Set its paper to the roll size you picked (for example 38 × 25 mm) in the printer's own settings. The print window then prints one label per page, which the printer cuts.
#Goods or service
Every product is either Goods, things you buy, keep and sell, whose stock is counted, or a Service, work you do, such as printing, repairs, design, consulting or transport, which has no stock.
| Goods (stock counted) | Service (no stock) | |
|---|---|---|
| Stock box in the form | Yes | No |
| Selling it on an invoice | Takes the quantity out of stock | Moves no stock, and never says "out of stock" |
| Buying it on a purchase bill | Adds the quantity to stock | Moves no stock |
| Low-stock alerts, the bell, the Dashboard low-stock strip, the stock report | Included | Never included |
| Manufacturing | Can be a raw material or be made here | Neither |
| Code box | HSN / SAC Code | SAC Code |
| Unit list | Every unit | Service units first (Hrs, Day, Month, Project, Nos, Page...). A new service starts on Hrs; change it to whatever you bill by. |
| Stock column in the list | The count, or Out of Stock | Service |
Products you already have stay Goods. To switch one, click its pencil, choose Service (no stock) and click Update; any stock it had is dropped. To switch back, choose Goods and type its stock.
On an invoice, picking a service from your products fills in that line's SAC, unit, rate and GST; other lines are not touched. For a service billed as one fixed fee, with no quantity on the invoice, see Goods, services or both.
When importing products from a spreadsheet, a Type column with Service makes the row a service. See Importing products.
#HSN and SAC codes
HSN (Harmonised System of Nomenclature) codes classify goods, such as 4802 for paper or 8471 for computers. SAC (Services Accounting Code) codes classify services and start with 99, such as 998314 for IT services. The code decides the GST rate and is reported in your GSTR-1, in the HSN summary.
- Businesses with a turnover up to ₹5 crore must show at least a 4-digit HSN on invoices to registered buyers; above ₹5 crore, 6 digits on every invoice.
- Find your code on your supplier's bill, from your accountant, or with the HSN search on the GST portal.
- On the invoice, the app knows the usual GST rate of common codes and shows it under the HSN box. See Line items.
See also the glossary.
#Bulk edit: changing many products at once
Use it when prices go up across the board, after a GST rate change, or to correct stock after counting your shelves. Bulk edit turns the table into a grid of boxes: Name, Category, HSN/SAC, Purchase price, Selling price, MRP, GST %, Unit and Stock.
- Narrow the list (optional)Search first, for example by an HSN code, or pick a category, to edit only those products. The search box and the category list are locked while you edit.
- StartClick Bulk edit.
- Type the changesChange any boxes, in any rows. Each changed row turns blue, and the bar at the top counts them: "3 products changed".
- Save onceClick Save changes (3). You see "3 products updated" and the normal list comes back.
Cancel drops every change. Only the boxes you changed are saved: if an invoice in another window sold some stock meanwhile, that is not undone (unless you changed that product's stock yourself).
The same rules as the product form apply: every product needs a name, GST % must be 0 to 100, and prices, MRP and stock must be numbers. If one row breaks a rule, nothing is saved and you are told which product to fix, such as "Not saved: Tea: GST % must be 0 to 100". Make and the export buttons wait until you save or cancel.
To give many products the same category, type it in the Category column of each. Emptying a category or an MRP box removes that detail from the product; the other details stay.
"2 saved, 1 failed. Try again.": the app could not reach its data for one product. Click Bulk edit again, check the product, and save it again.
#How stock is counted
Stock is counted for a line only when it is linked to a product: picked from your products on the invoice or bill, not just typed in.
- Selling: saving a Tax Invoice, Bill of Supply, Composition bill or Delivery Challan takes the quantity out. Change the quantity later and save, and only the difference moves. With godowns on, it comes out of the godown picked on the sale.
- Returns: a Credit Note puts the quantity back.
- Quotations and proformas move no stock. The invoice you convert them into does.
- Buying: saving a purchase bill adds the quantity in, and adds any new item to your products.
- Cancelling an invoice puts its stock back where it came from; un-cancelling takes it out again. Deleting an invoice puts its stock back too.
- Making: a production entry uses up raw materials and adds the finished product.
Out of Stock shows in red at zero or below. Purchases and deletions never take stock below zero; selling more than you have does, so you notice.
A service is never counted. Goods whose stock box was left blank are not counted either until stock first moves: a purchase bill adds to them from zero, and a sale takes them below zero, so you notice.
The stock report shows each product's stock and value on any date.
#Correcting stock by hand
There is no separate stock adjustment screen. After counting your shelves, or for breakage, a free sample or opening stock:
- One productClick its pencil, type the real count in Stock Quantity, and click Update.
- Many productsClick Bulk edit, type the counts in the Stock column, and click Save changes.
Stock typed in by hand has no date, so the stock report counts it as if it changed today. Write the reason in the product's description if you want to remember it.
Stock is one count per product. Batches split that count, they never add to it; see Batches and expiry. When stock sits in more than one place, turn on godowns; the total stays one number.
#Batches and expiry
For medicines, food, cosmetics and anything else that goes bad, turn on Track batches and expiry in the product form. The product keeps its one stock number, and its batches say how much of that number is in each batch and when each expires.
- Turn it onOpen the product's pencil, tick Track batches and expiry under Batches, serials and warranty, and click Update.
- List what you holdThe Batches editor takes a batch number, an expiry date, a quantity and the cost per unit for each batch; Add batch adds a row and the bin removes one. A summary shows In batches, Not in any batch and the value of the stock. Batches cannot add up to more than the stock; leave the rest unbatched and the app shows it.
- Buy into a batchOn a purchase bill or goods receipt, a tracked line gets Batch and Expiry boxes beside it. Fill them in and the quantity joins that batch; the same batch number and expiry is added to, not duplicated. Later the shop can be told which lot a complaint came from.
- Sell the oldest firstOn an invoice or POS line the Batch box starts on the earliest-expiring batch that still has stock (first expiry, first out). Change it to sell a different batch: the line shows that batch's expiry, and saving takes the quantity out of the batch you picked. Goods already sold stay in the batch they left.
The Not in any batch figure is the stock that no batch explains: opening stock typed in by hand, or a sale from a batch nobody named. It can go negative when a batch says it holds more than the product's stock; that shows in red, and adding the missing batch or correcting the product's stock clears it. Batches are a split of the product, so nothing is counted twice in stock, in the stock report, in godowns or in the total value.
Editing a purchase bill or goods receipt moves only the difference: change a line from 10 to 6 and 4 leave its batch; change the batch number and the quantity moves from the old batch to the new one. Deleting or removing the line takes its quantity back out. A return, a credit note or a correction that names no batch leaves the stock unbatched rather than guessing which lot it was.
Expiry: the stock report lists every batch that has expired or expires in the next 90 days, with its quantity and value. An expired batch still counts in stock and in the total until you write it off: reduce the batch quantity in the product's batch editor, and the product's stock with it.
A new product typed straight into a purchase bill is saved untracked. To batch it, save the bill, then open the product and tick Track batches and expiry before the next purchase. Turn tracking off to hide the batch boxes and keep the balances as they are.
#Serial numbers and warranty
For electronics, machines and anything sold with a warranty, tick Track serial numbers on the product and give a Warranty (months). The app then keeps a register of every serial sold and when its warranty ends, built from your invoices so it can never drift from them.
Selling: pick the product on an invoice or in POS and the line gains a Serial numbers box. Type or scan the numbers in, separated by commas, semicolons or one per line; a note under the box says how many you have entered and, if it does not match the quantity, that you have a different number than you are selling. The mismatch is a warning, not a block: one serial for two units is sometimes right for a kit. The line also copies the product's warranty months, and that copy is what the invoice and the register use.
On the printed invoice, the batch, expiry, serial numbers and warranty of a tracked line print under the item name, in both the A4 and the thermal layouts, so the client sees exactly which unit they bought and until when it is covered.
The register: Serials & warranty at the top of the Products screen opens a list with one row per serial sold: the serial, product, invoice, date sold, client, warranty months, the date the warranty ends, and its status — In warranty, Ending soon (within 30 days), Expired or No warranty. Search by serial, product, invoice or client, filter by status (each choice shows its count), and export with Print / PDF, Excel or CSV.
A cancelled invoice and a credit note add no warranty. The warranty months come from the line when it was written, so changing the product's warranty later does not rewrite sales already made. Serials are not stock: they are a record of units sold, and stock still moves by quantity.
The Serial numbers box does not appear. The product is not ticked Track serial numbers; open it and tick the box. The register is empty. No invoice with a serial has been saved yet. A serial sold on a cancelled invoice is missing. That is intended: cancelled sales and credit notes add no warranty.
#Godowns: stock in more than one place
A godown is any place you keep stock: the main shop, a second branch, a warehouse, a godown behind the shop. Each product still has one total; the godowns say where that total sits. Turning this on never changes a stock number you already know.
Turn it on in Settings → Features: tick Godowns (branches) and save. It is off to start. On the Products screen, Godowns then opens the godown screen, with a Products button to come back.
- Add the godownsClick Add godown, give it a name (Main shop, Warehouse 2), and optionally an address, contact person and phone. Tick default for the one new bills and receipts should start on.
- Say what is whereIn Stock by godown, type how much of each product a godown holds. The total never changes: whatever you have not placed stays in Not in a godown, and Put the rest in moves it into one godown in a click.
- Pick a godown on documentsInvoices, POS sales, purchase bills and goods receipts have a godown box. New ones start on the default godown; change it on the document when the goods came from, or went to, another one.
- Move stockWhen you carry goods from one place to another, record a stock transfer so each godown stays right.
What a godown changes:
| Where | What happens |
|---|---|
| Selling (Tax Invoice, POS, Bill of Supply, Delivery Challan) | The quantity comes out of the godown picked on the sale. Cancelling or deleting the invoice puts it back there. |
| A Credit Note | Puts the quantity back in the godown the original sale came from. |
| Purchase bill, goods receipt | The quantity goes into the godown picked on the bill or receipt. |
| Editing a saved invoice or bill | Moving a line to another godown takes it out of the old one and puts it in the new one; the total follows. |
| Products list, low-stock alerts, GST returns | Unchanged: they use the one total. |
A product never placed in a godown keeps all its stock in Not in a godown until it is placed by hand or billed from a godown; the first document with a godown takes its whole stock there before moving the quantity. A service has no stock, so godowns never apply to it.
Switching a godown off hides it from new bills but keeps its stock and history. A godown holding stock must stay active, and one used on a transfer must have that transfer deleted before it can be deleted.
The stock report adds a Stock by godown today table beside closing stock, and the Godowns screen itself always shows where each product's total is.
#Stock by godown
The table under the godown list is the placement: one row per goods product, one column per active godown, then Not in a godown and Total. Type a quantity in a cell and click away (or press Enter) to save it. You cannot put more in a godown than is free: the message names how much is left, and the cell goes back.
Taking a product's stock to zero in every godown leaves the total as it is only if that is the real total. To correct a count after counting the shelves, change the total first (Products → pencil → Stock Quantity), then place it. Lowering a total below what the godowns hold shows the difference as a negative Not in a godown in red; reduce a godown's quantity to fix it.
Typing here is for setting up and for corrections. Day-to-day, the godowns move on their own as you bill and receive.
#Moving stock between godowns
New transfer records goods carried from one godown to another. It needs at least two godowns.
- From and toPick the godown the goods leave and the one they reach.
- Date and noteToday to start. The note is for you, such as "Tuesday van".
- ProductsChoose a product and its quantity; Add product adds a line. At the from godown shows how much is there, so you can see what can be moved.
- Save transferIt is numbered TRF/26-27/0001 and the stock moves at once. The total on the product does not change.
You cannot transfer more than the source godown holds, a service, or to the same godown. The message says which, and nothing is saved. A product not yet placed is taken to hold all its stock in the from godown first.
The Stock transfers list shows the number, date, both godowns, number of lines, quantity and note. The bin deletes a transfer and puts the stock back where it came from; do that only when the movement never happened.
Every godown must be different or "The two godowns must be different": pick a different to godown. only 3 at that godown, so 5 cannot be transferred: reduce the quantity, or move the rest in after a purchase is entered.
A godown will not delete: it still holds stock (move it first), or it is on a transfer (delete the transfer first). The message says which.
#Low-stock alerts
A product at or below your threshold shows its stock in amber here, is listed on the Dashboard, and adds to the notification bell. The threshold is 5 to start; change it, or turn alerts off, in Settings. It is one threshold for every product. With alerts off, stock is still counted and Out of Stock still shows in red.
#Importing products from a spreadsheet
Have your price list in Excel, or moving from another program? Import CSV adds all the products and services at once.
- Open the windowClick Import CSV on the Products screen. The window Import products opens.
- Get the sample fileClick Download sample file.
Products-sample.csvlands in your Downloads folder, with the right column headings and two demo rows: a product (Goods) and a service. - Fill it inOpen it in Excel or Google Sheets. Replace the two demo rows with your own, one product or service per row. Keep the first row (the headings) as it is.
- Save as CSVIn Excel, File → Save As → CSV UTF-8 (Comma delimited) or CSV (Comma delimited). In Google Sheets, File → Download → Comma-separated values.
- Choose the fileClick Choose file. Nothing is saved yet: the window shows how many are new, how many saved products will get their empty details filled in, how many are already in your list (skipped), and every row with a problem.
- ImportClick Import (it shows the number, such as Import 40). You see "Imported 40 products", and they appear in the list.
From Excel or Vyapar: you can choose an Excel file (.xlsx) instead of a CSV, such as the item list Vyapar exports. If the file has several sheets, pick the one with your items under Sheet.
From Tally: in Tally, go to Gateway of Tally → Export → Masters, choose format XML and export. Choose that .xml file here. Your stock items come in with their HSN, GST rate, unit and price, their opening stock quantity and value, and their stock group as the product category (items directly under the reserved parent group get none). Check the quantities against your shelves after the import; if you import the same file into a business that already counted its stock, the opening quantity is not added again for products already saved.
Importing again fills in blanks. A product already in your list is never added twice. If it has empty details (no HSN, no price, 0% GST with no HSN, no unit or stock), they are filled in from the file. A detail that already has a value is never changed.
The columns (headings in small or capital letters, in any order; spaces and % do not matter):
| Column heading | Holds |
|---|---|
Name (or Product, Product Name, Item) | Required. Rows without a name are skipped. |
Type | Goods or Service. Blank means Goods. A service gets no stock. See Goods or service. |
Category (or Group, Item Group, Product Category) | Optional. The category the product belongs to. See Categories. |
HSN/SAC (or HSN, SAC, HSN Code) | HSN or SAC code |
Unit | Nos if left out. Write it as in the app's list (Kg, Ltr, Pcs, Hrs, Page), so the GST returns get the right unit code. |
Purchase Price (or Cost) | What you pay for one unit |
Selling Price (or Rate, Price) | What you charge for one unit |
MRP (or Maximum Retail Price, Printed Price) | Optional. The printed maximum retail price |
GST % (or GST Rate, Tax %) | GST rate, such as 18. 0 to 100. |
Stock (or Quantity, Opening Stock) | Opening stock of goods: how many you have today. Leave it blank for a service, or for goods you do not count. |
Opening Value | Optional. The rupees that opening stock is worth. When Purchase Price is blank, value ÷ quantity becomes the purchase price, so profit reports are right from day one. |
Description | Optional |
The sample file looks like this:
Name,Type,Category,HSN/SAC,Unit,Purchase Price,Selling Price,MRP,GST %,Opening Stock,Opening Value,Barcode,SKU,Batch,Expiry,Description
Demo A4 Paper Ream 75 GSM,Goods,Stationery,4802,Nos,220,280,320,18,50,11000,2000000000015,A4-75,,,Sample goods row - replace with your own
Demo Printing service,Service,Services,998912,Page,,5,,18,,,,PRINT-A4,,,Sample service row - a service has no stock
Products you already have (same name, any capitals) are skipped, and so are repeats inside the file, so importing the same file twice is safe. The CSV saved by the CSV button above the list uses the same columns, so you can export, edit in Excel and import into another copy of the app.
Old invoices are imported somewhere else: on the Dashboard, with CSV import / export, which has its own template. See Importing and exporting invoices as CSV. The link at the bottom of the import window goes there too.
A row is listed as a problem, such as "Row 4 (Tea): GST % must be 0 to 100" or "Type must be Goods or Service": fix that row in the file and choose it again (the rows already imported are skipped). Nothing is read: the file is not a plain CSV, or the headings are not in the first row. An .xlsx file renamed to .csv does not work. See A CSV import did not work.
#Manufacturing: making products from raw materials
If you make what you sell (furniture, sweets, garments, printed boxes), the app can use up the raw materials and add the finished product to stock in one step, and tell you what each unit costs you to make.
Turn it on first: Settings → Features, tick Manufacturing (bill of materials) and save. It is off to start, and turning it off again hides it without deleting anything. Once on, you get:
- a Made here (from raw materials) tick in the product form, for its bill of materials;
- a Make button at the top of Products, to record production;
- a Production list under the product table.
#1. Give the product its raw materials (bill of materials)
A bill of materials is the recipe: which raw materials, and how much of each, go into one unit of the finished product.
- Add the raw materialsAdd each raw material as a normal product, with its purchase price and stock (or buy it in on a purchase bill).
- Open the finished productClick its pencil (or Add Product for a new one).
- Tick Made hereTick Made here (from raw materials). A box opens: Raw materials used to make 1 unit of this product.
- List the materialsOn each line, choose the material under Choose a product… and type the quantity for one unit made; its unit shows beside the box. Add material adds a line; the cross removes one.
- Check the costCost per unit shows the materials' purchase prices times those quantities.
- SaveClick Update (or Save). The list now shows Made here · cost under the name.
Rules, checked when you save: at least one material; a product chosen on every line; every quantity more than 0; no product listed twice (add the quantities together on one line); a product cannot be in its own list; and two products cannot use each other (chair uses seat, seat uses chair). The message says which, and nothing is saved.
A raw material can itself be made here (a seat made from wood and foam). If it has no purchase price, its cost comes from its own raw materials.
Unticking Made here and saving stops the product being made; production already recorded stays.
#2. Make: record what you made
Each time a batch is finished, record it so stock stays right.
- Open MakeClick Make at the top of Products. The window is Make (record production).
- Product madeChoose the product. Only products with a raw materials list are offered.
- Quantity madeHow many you made, in the product's unit.
- DateToday to start. Change it if you are recording a batch made earlier.
- Note (optional)Anything to remember, such as "Batch 12".
- Check the tableEach raw material shows Per unit, Will use, In stock and Left after; the last row is the finished product with its stock after. Below it, Cost of materials for this batch, at today's purchase prices.
- SaveClick Save production. You see "Production saved: 10 Nos of Chair", the stock changes, and the entry is added to the Production list.
If a raw material would go below zero, it is shown in red with a warning, and saving asks Not enough raw materials in stock; Save anyway goes ahead. That is fine when you record production late and have not entered the purchase bill yet.
No product has a raw materials list yet.: give a product its raw materials first.
"Quantity made must be more than 0" or "Enter the date it was made": fill in those boxes. A message naming a product and a raw material means its list has a problem; open that product and fix the list.
"Could not save production, nothing was changed.": try again; if it keeps happening, see Saving and working in the app.
#Worked example
Sharma Furniture makes chairs. One chair takes 4 chair legs (₹50 each), 1 seat (₹300) and 0.2 kg screws (₹400 a kg), so the cost per unit is 4 × 50 + 300 + 0.2 × 400 = ₹580. Stock before: 100 legs, 20 seats, 5 kg screws, 3 chairs.
| Make 10 chairs | Used | Stock after |
|---|---|---|
| Chair leg | 40 | 60 |
| Seat | 10 | 10 |
| Screws | 2 kg | 3 kg |
| Chair (made) | +10 | 13 |
The entry's cost of materials is 10 × ₹580 = ₹5,800.
#3. The production list
Under the product table, Production lists the entries of the business you have open, newest first: Date, Product, Qty made, Cost of materials and Note.
| Control | What it does |
|---|---|
| From / To | Show only entries between these dates. Leave blank for all. |
| Print / PDF, Excel, CSV | Save the entries shown. |
| Eye (View) | Opens the entry: see below. |
| Bin (Delete) | Deletes the entry after asking, and puts its stock back exactly: in the example, 40 legs, 10 seats and 2 kg screws back, 10 chairs out. |
An entry cannot be edited: to change one, delete it and enter it again. The stock report counts production by its date.
#Viewing a production entry
The eye opens Made 10 Nos of Chair (the quantity and product), with its date and note, and a table of each Raw material used with its Qty, Rate and Cost, and the Total cost of materials. The rates are the purchase prices on the day it was saved, so changing a price later does not change old entries. Delete deletes it as above; Close closes it.